Overview
Sensorless homing and stall detection is functional for all TMC2209’s, TMC2226’s and TMC5160’s and is supported on the Fly-Super5Pro H723.
Getting stall detection working can be tricky and sensorless homing will almost certainly require some tuning.
As always the Duet wiki pages provide a lot of information that may also be of help.
board.txt Changes
To use sensorless homing/stall detection with TMC2209 or TMC2226 the following line must be added to the board.txt file. It is not needed with TMC5160. The pin numbers below start at Driver 0 (typically the X driver)
stepper.TmcDiagPins = { PB_7, PC_12, PC_7, PC_14, PC_6 }
Please only include the diag pin numbers where you intend to use sensorless homing on that axis.
For example, if you only intend to use sensorless homing/stall detection on driver 0 and driver 1, only include stepper.TmcDiagPins = { PB_7, PC_12 } in your board.txt file.
If you only want to enable sensorless homing/stall detection on driver 1, only include stepper.TmcDiagPins = { NoPin, PC_12 }
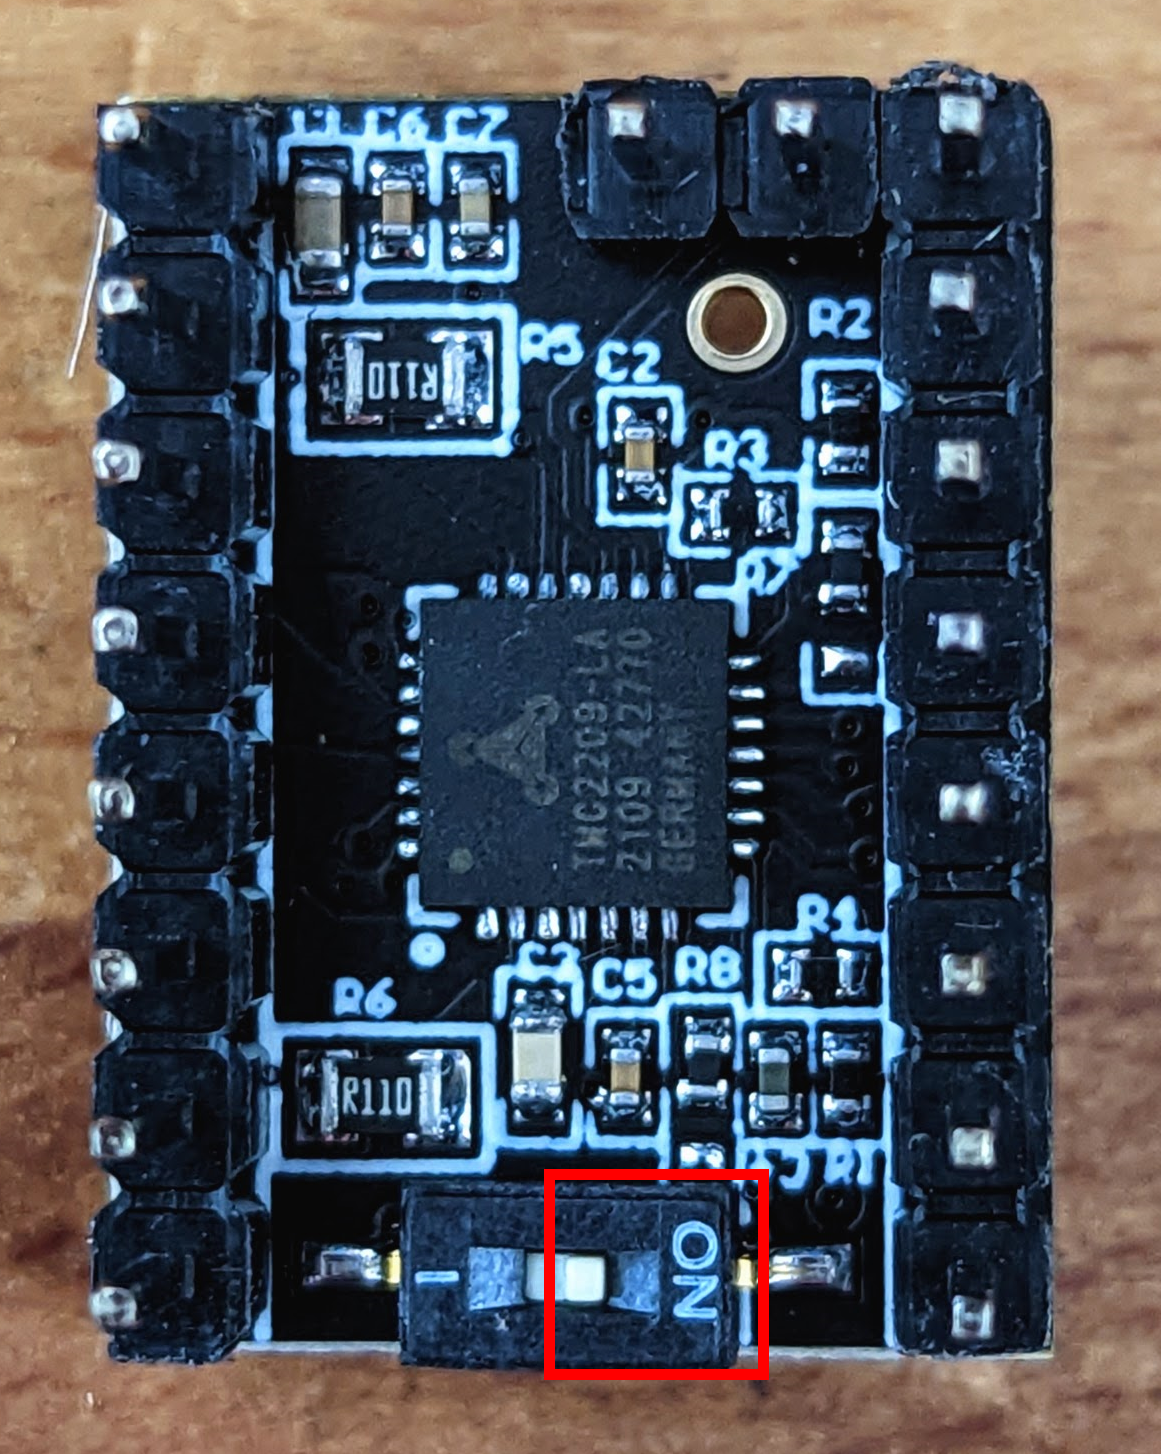
If you are using Flymaker TMC2209 drivers, you need to enable the DIAG pin on the driver.

Config.g Changes
TMC2209 and TMC2226
The only modification required in config.g is to add the following to each M569 command where sensorless homing is to be used.
D3 V40
D3 sets the driver into stealthchop mode. V40 sets the speed at which the driver switches over to spreadcycle. A different V value can be set to reduce or increase the switchover speed. Send M569 Px (where x is the driver number to be queried) and the tpwmthrs value reported is the switchover speed. In the case of V40, the switchover speed from stealthchop to spreadcycle would be 187.5mm/s.
TMC5160
The only modification required in config.g is to add the following to each M569 command where sensorless homing is to be used.
D2
D2 sets the driver into spreadcycle mode.
Driver checks
At this point it is a good time to check whether your drivers are functioning correctly.
Send M122 and check that each driver is being recognised correctly.
Example 2209/2226 detection - Driver 0: standstill, SG min 0, mspos 8, reads 10937, writes 14 timeouts 0
Example 5160 detection - Driver 0: standstill 5160, SG min n/a, mspos 8, reads 14652, writes 15
If M122 reports Driver Not Present where a driver is expected, then you need to revisit the driver jumpers and settings.
Also, if you have made board.txt changes, send M122 P200 and make sure the changes are reflected in the output.
Homing file changes
This is where the main setup of sensorless homing takes place.
Before using the examples below to config the sensorless homing, it is suggested to test each axis with the following homing code. Ensure that you comment out your current homing code using ;
The code would go in the homex.g or homey.g (adjusting any X moves to Y)
G91
M915 P0 S-127 H10 R1 ; Set very sensitive stall detect
M574 X1 S3 ; configure endstop for stall detection
G1 X-200 H1 ; Should stall pretty much immediately
G90
Once you have confirmed that your motors are stalling, adapt the example cartesian homing files below. Copies are also included at the below google drive links. Examples of corexy sensorless homing files can also be found below.
The S, H and R values will probably need tweaking for your system.
H is typically 200 for 1.8 degree motors and 400 for 0.9 degree motors.
S is the stall detection threshold which should be between -127 and +127.
R is the action to take on detecting a stall. 0 = no action (default), 1 = just report it, 2 = pause print, 3 = pause print, execute /sys/rehome/.g, and resume print
; homex.g
; called to home the X axis
;
M400					          ; Wait for all moves to stop
G91						          ; Use relative moves
G1 H2 X0.01	Z0.01		    ; Move X a small amount to enable
M400					          ; Wait for all moves to stop
G4 P200					        ; Delay to allow TMC to detect stopped state
M915 P0 S-10 H200 R0	  ; Configure stall detect
M574 X1 S3				      ; Configure X endstop
M913 X50 Z50			      ; Lower X and Z power
G4 P200					        ; Delay to ensure settings are made
G1 H2 Z5 F2500			    ; Lift Z relative to current position
G1 H1 X20 F2000			    ; Back away from endstop
M400					          ; Wait for all moves to stop
M915 P0 S-30 H200 R0	  ; Configure stall detect
G4 P200					        ; Delay to ensure settings are made
G1 H1 X-230 F2000		    ; Move towards endstop until it stalls
M400					          ; Wait for all moves to stop
M915 P0 S-10 H200 R0	  ; Configure stall detect
G4 P200					        ; Delay to ensure settings are made
G1 H1 X10 F2000			    ; Back away from endstop
M400					          ; Wait for all moves to stop
M915 P0 S-30 H200 R0	  ; Configure stall detect
G4 P200                 ; Delay to ensure settings are made
G1 H1 X-230 F2000		    ; Move towards endstop until it stalls
M915 P0 S-10 H200 R0	  ; Configure stall detect to be less sensitive
G1 X1 F1000				      ; Move away from stop and clear stall
G1 H2 Z-5 F2500			    ; Return Z to original position
M400					          ; Wait for all moves to stop
G90						          ; Absolute positioning
M913 X100 Z100			    ; Back to full power
M915 P0 S20 H200 R1		  ; Report any stalls
; homey.g
; called to home the Y axis
;
M400					          ; Wait for all moves to stop
G91						          ; Use relative moves
G1 H2 Y0.01	Z0.01		    ; Move Y a small amount to enable
M400					          ; Wait for all moves to stop
G4 P200					        ; Delay to allow TMC to detect stopped state
M915 P1 S-10 H200 R0	  ; Configure stall detect
M574 Y1 S3				      ; Configure Y endstop
M913 Y50 Z50			      ; Lower Y and Z power
G4 P200					        ; Delay to ensure settings are made
G1 H2 Z5 F2500			    ; lift Z relative to current position
G1 H1 Y20 F2000			    ; back away from endstop
M400					          ; Wait for all moves to stop
M915 P1 S-30 H200 R0	  ; Configure stall detect
G4 P200					        ; Delay to ensure settings are made
G1 H1 Y-300 F2000		    ; Move towards endstop until it stalls
M400					          ; Wait for all moves to stop
M915 P1 S-10 H200 R0	  ; Configure stall detect
G4 P200					        ; Delay to ensure settings are made
g1 H1 Y10 F2000			    ; Back away from endstop
M400                    ; Wait for all moves to stop
M915 P1 S-30 H200 R0	  ; Configure stall detect
G4 P200                 ; Delay to ensure settings are made
G1 H1 Y-300 F2000		    ; Move towards endstop until it stalls
M915 P1 S-10 H200 R0	  ; Configure stall detect to be less sensitive
G1 Y1 F1000				      ; Move away from stop and cancel stall
G1 H2 Z-5 F2500			    ; Return Z to original position
M400					          ; Wait for all moves to stop
G90						          ; Absolute positioning
M913 Y100 Z100			    ; back to full power
M915 P1 S20 H200 R1		  ; Report any stalls
; homeall.g
; called to home all axes
;
; This makes use of stall detection to perform sensorless homing.
; The initial position is unknown so we may be up against either end
; of the machine. We need to take care to handle hitting either min or max
; endstops and to try and ensure that stall detect operates correctly. To
; do this and to minimise and damage if we hit the machine we operate at a
; reduced current during these moves.
M400					            ; Wait for all moves to stop
G91						            ; Use relative moves
G1 H2 X0.01 Y0.01 Z0.01	  ; Move X, Y and Z a small amount to force enable
G4 P200					          ; Wait to ensure TMC sees this as stopped state
M915 P0 S-10 H200 R0	    ; Configure stall detect in case we hit max endstops
M915 P1 S-10 H200 R0	    ; Configure stall detect
M574 X1 S3				        ; Configure X endstop
M574 Y1 S3				        ; Configure Y endstop
M913 X50 Y50 Z50		      ; Lower X, Y and Z power
G4 P200					          ; Delay to ensure settings are made
G1 H2 Z5 F2500			      ; Lift Z relative to current position
G1 H1 X20 Y20 F2800		    ; Back away from endstop
M400                      ; Wait for all moves to stop
M915 P0 S-30 H200 R0	    ; Configure stall detect for home, use more sensitive setting
M915 P1 S-30 H200 R0	    ; Configure stall detect
G4 P200                   ; Delay to ensure settings are made
G1 H1 X-300 Y-300 F2800	  ; Move towards endstop until it stalls
M400					            ; Wait for motion to stop, we should now be home
; There is a small chance that the above sequence did not work
; sometimes the inital movements after the printer has been powered
; on trigger stall detection. To avoid having the home position set
; incorrectly, we repeat the home operation again to be safe.
M915 P0 S-10 H200 R0	    ; Configure stall detect
M915 P1 S-10 H200 R0	    ; Configure stall detect
G1 H1 X10 Y10 F2800		    ; Back away from endstop
M400                      ; Wait for all moves to stop
M915 P0 S-30 H200 R0	    ; Configure stall detect for home detect
M915 P1 S-30 H200 R0	    ; Configure stall detect
G4 P200                   ; Delay to ensure settings are made
G1 H1 X-300 Y-300 F2800	  ; Move towards endstop until it stalls
M400					            ; Wait for all moves to stop
M915 P0 S-10 H200 R0	    ; Configure stall detect to be less sensitive
M915 P1 S-10 H200 R0	    ; Configure stall detect
G4 P200                   ; Delay to ensure settings are made
G1 X1 Y1 F1000			      ; Move away from stop and cancel stall
M400					            ; Wait for all moves to stop
G90						            ; Absolute positioning
G1 X117 Y128 F5000        ; Go to first bed probe point and home Z
G30                       ; Home Z by probing the bed
M913 X100 Y100 Z100		    ; Back to full power
M915 P0 S20 H200 R1		    ; Configure stall detect to report stalls
M915 P1 S20 H200 R1		    ; on both X and Y
Troubleshooting
If your drivers aren’t stalling at all with the test code, check the output of M122 P200 and make sure the pins are being listed correctly.
If your drivers work with the test code but don’t stall with the example homing files, lower the value of S.
If your drives stall straight away with the example homing files, increase the S value.