Overview
Both serial screens (e.g. Fly Screens, BTT TFT, Paneldue) and 12864 displays (like the stock ender 3 screen) can be connected to an Fly-E3-Pro-v3.
These instructions cover serial screens. Instructions for 12864 screens can be found here.
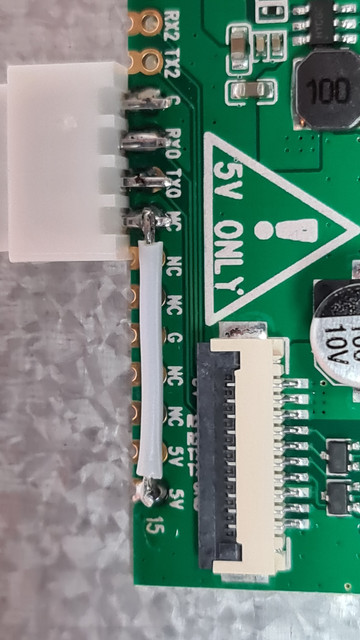
Use pins +5V, GND, TX(PA_9) and RX(PA_10) on the screen header. These should be connected to +5V, GND, TX and RX on the PanelDue, making sure that TX and RX are swapped.
In config.g, the following command should be added.
M575 P1 S1 B57600
From RepRapFirmware 3.2, it is possible to update the firmware on the PanelDue directly from the board. Please see here for further instructions.
Use pins +5V, GND, TX(PA_9) and RX(PA_10) on the screen header. These should be connected to +5V, GND, TX and RX on the TFT, making sure that TX and RX are swapped.
Overview
We don’t recommend using the BTT TFT firmware with RRF, even though it advertises as working with RRF. Instead, you should use this fork as it fixes a lot of issues with the BTT version and it actually works.
Loading the firmware
There is now an RRF config.ini
It needs to be renamed from config_rrf.ini to config.ini for flashing of the firmware.
Config.g Changes
Add the following line to your config.g to enable the screen
M575 P1 S2 B57600
If the screen says No printer connected try with other values for the S parameter (possible values are 0, 1, 2 and 3)

Please note the pinout of 5v (connected to NC), TX, RX and 0v.
The cable that is supplied may be equipped with the correct connection for a duet board, so the plug will need changing to fit these boards. Remember to make sure that TX and RX are swapped.
Use pins +5V, GND, TX(PA_9) and RX(PA_10) on the screen header. These should be connected to +5V, GND, TX and RX on the Fly Screen, making sure that TX and RX are swapped.
In config.g, the following command should be added.
M575 P1 S0 B57600
The latest version of the screen firmware can be found here.
To update the screen, put the update.img onto a blank SD card. Put the SD card into the screen and power it up. The update will then be flashed automatically. Once finished, power down the screen and remove the SD card.