This page covers how to compile the firmware. These instructions are based on the new 3.2 unified firmware.
Preparation of software
- Download and install VSCode.
- Open VSCode and open the extension tab (this can be done by using the shortcut Ctrl+Shift+X) and search for windows-arm-none-eabi. Install the version by metalcode-eu. Close VSCode
- Download and install git.
- Then download and install make. Once installed you will need to add the location of the bin folder that is installed in to your windows path environment setting (typically found in
C:\msys64\usr\bin\make.exe). Make sure you add them to the system variables and not the user varaibles. While there also add the location of mkdir.exe, which will have been installed with git. It can be found in the usr/bin folder where git is installed. - Download and install the GNU Arm Embedded Toolchain. You can see which version of the Toolchain to use here. Tick the box at the end to install it to your PATH.
- Open VSCode
- On the top bar, click on Terminal and then New Terminal
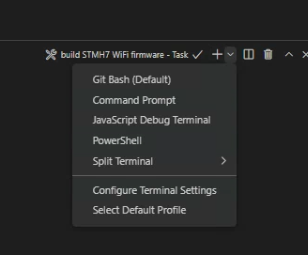
- Click on the icon shown below and then on Select Default Profile

- Click on Git Bash as default.

Preparation of firmware code - RRF3.2
Download the following github repositories. The preferred method for doing so is by using a git client (terminal or GUI). This allows for changes made to be tracked. My client of choice (jay_s_uk) is gitkracken.
- RRFBuild - The main project for building
- RepRapFirmware - the main RRF source code
- RRFLibraries - Support libraries for RRF
- CoreLPC - MCU specific support for LPC builds
- CoreSTM32F4 - MCU specific support for STM32F4 builds
- FreeRTOS - RTOS support package
- DuetWifiSocketServer - WiFi interface
Clone all of the repositories into the RRFBuild folder.
The resulting structure should look like this.

Preparation of firmware code - RRF3.3
Download the following github repositories. The preferred method for doing so is by using a git client (terminal or GUI). This allows for changes made to be tracked. My client of choice (jay_s_uk) is gitkracken.
- RRFBuild - The main project for building
- RepRapFirmware - the main RRF source code
- RRFLibraries - Support libraries for RRF
- CoreN2G - MCU specific support for LPC/STM32F4 builds
- FreeRTOS - RTOS support package
- DuetWifiSocketServer - WiFi interface
Clone all of the repositories into the RRFBuild folder.
The resulting structure should look like this.

Preparation of firmware code - RRF3.4
Download the following github repositories. The preferred method for doing so is by using a git client (terminal or GUI). This allows for changes made to be tracked. My client of choice (jay_s_uk) is gitkracken.
- RRFBuild - The main project for building
- RepRapFirmware - the main RRF source code
- RRFLibraries - Support libraries for RRF
- CoreN2G - MCU specific support for LPC/STM32F4 builds
- CANlib
- FreeRTOS - RTOS support package
- DuetWifiSocketServer - WiFi interface
Clone all of the repositories into the RRFBuild folder.
The resulting structure should look like this.

Preparation of firmware code - RRF3.5
Download the following github repositories. The preferred method for doing so is by using a git client (terminal or GUI). This allows for changes made to be tracked. My client of choice (jay_s_uk) is gitkracken.
- RRFBuild - The main project for building
- RepRapFirmware - the main RRF source code
- RRFLibraries - Support libraries for RRF
- CoreN2G - MCU specific support for STM32 builds
- Duet3Expansion - expansion board source code
- CANlib - CAN support library
- FreeRTOS - RTOS support package
- WiFiSocketServerRTOS - WiFi interface
- IAP - IAP for SBC flashing
Clone all of the repositories into the RRFBuild folder.
Preparation of firmware code - RRF3.6
Download the following github repositories. The preferred method for doing so is by using a git client (terminal or GUI). This allows for changes made to be tracked. My client of choice (jay_s_uk) is gitkracken.
- RRFBuild - The main project for building
- RepRapFirmware - the main RRF source code
- RRFLibraries - Support libraries for RRF
- CoreN2G - MCU specific support for STM32 builds
- Duet3Expansion - expansion board source code
- CANlib - CAN support library
- FreeRTOS - RTOS support package
- WiFiSocketServerRTOS - WiFi interface
- IAP - IAP for SBC flashing
Clone all of the repositories into the RRFBuild folder.
Building the firmware
Open VSCode.
Go file -> open folder and browse to the RRFBuild folder.
Once opened, the firmware can be built using terminal -> run build task and picking the type of build you want to make.
NOTE: From 3.5.0-rc.4 onwards we create an individual .bin file for each board. Only a small subset of boards are listed in the build task menu, if you require a build for a board that is not listed you may need to add a new build task. See: build task configuration